MAWL-C1+ in Infrared

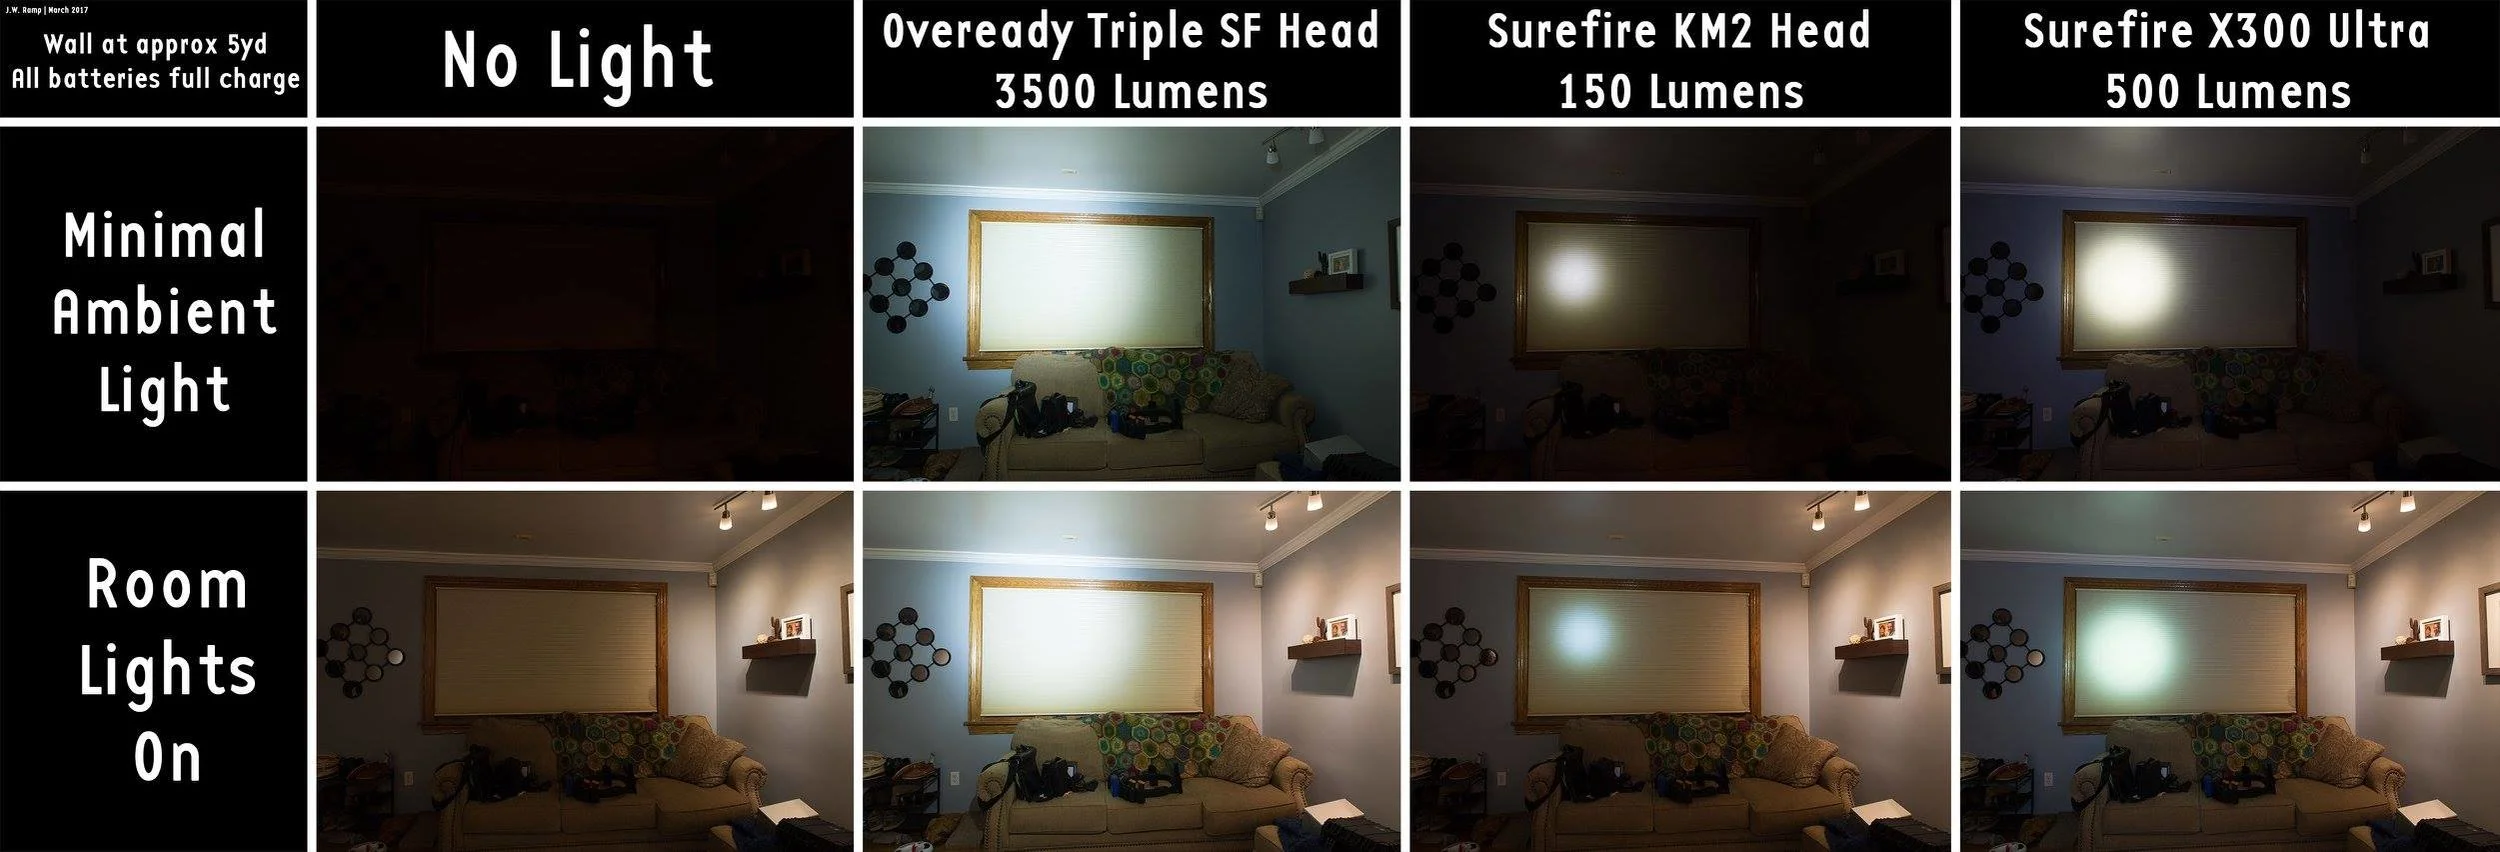
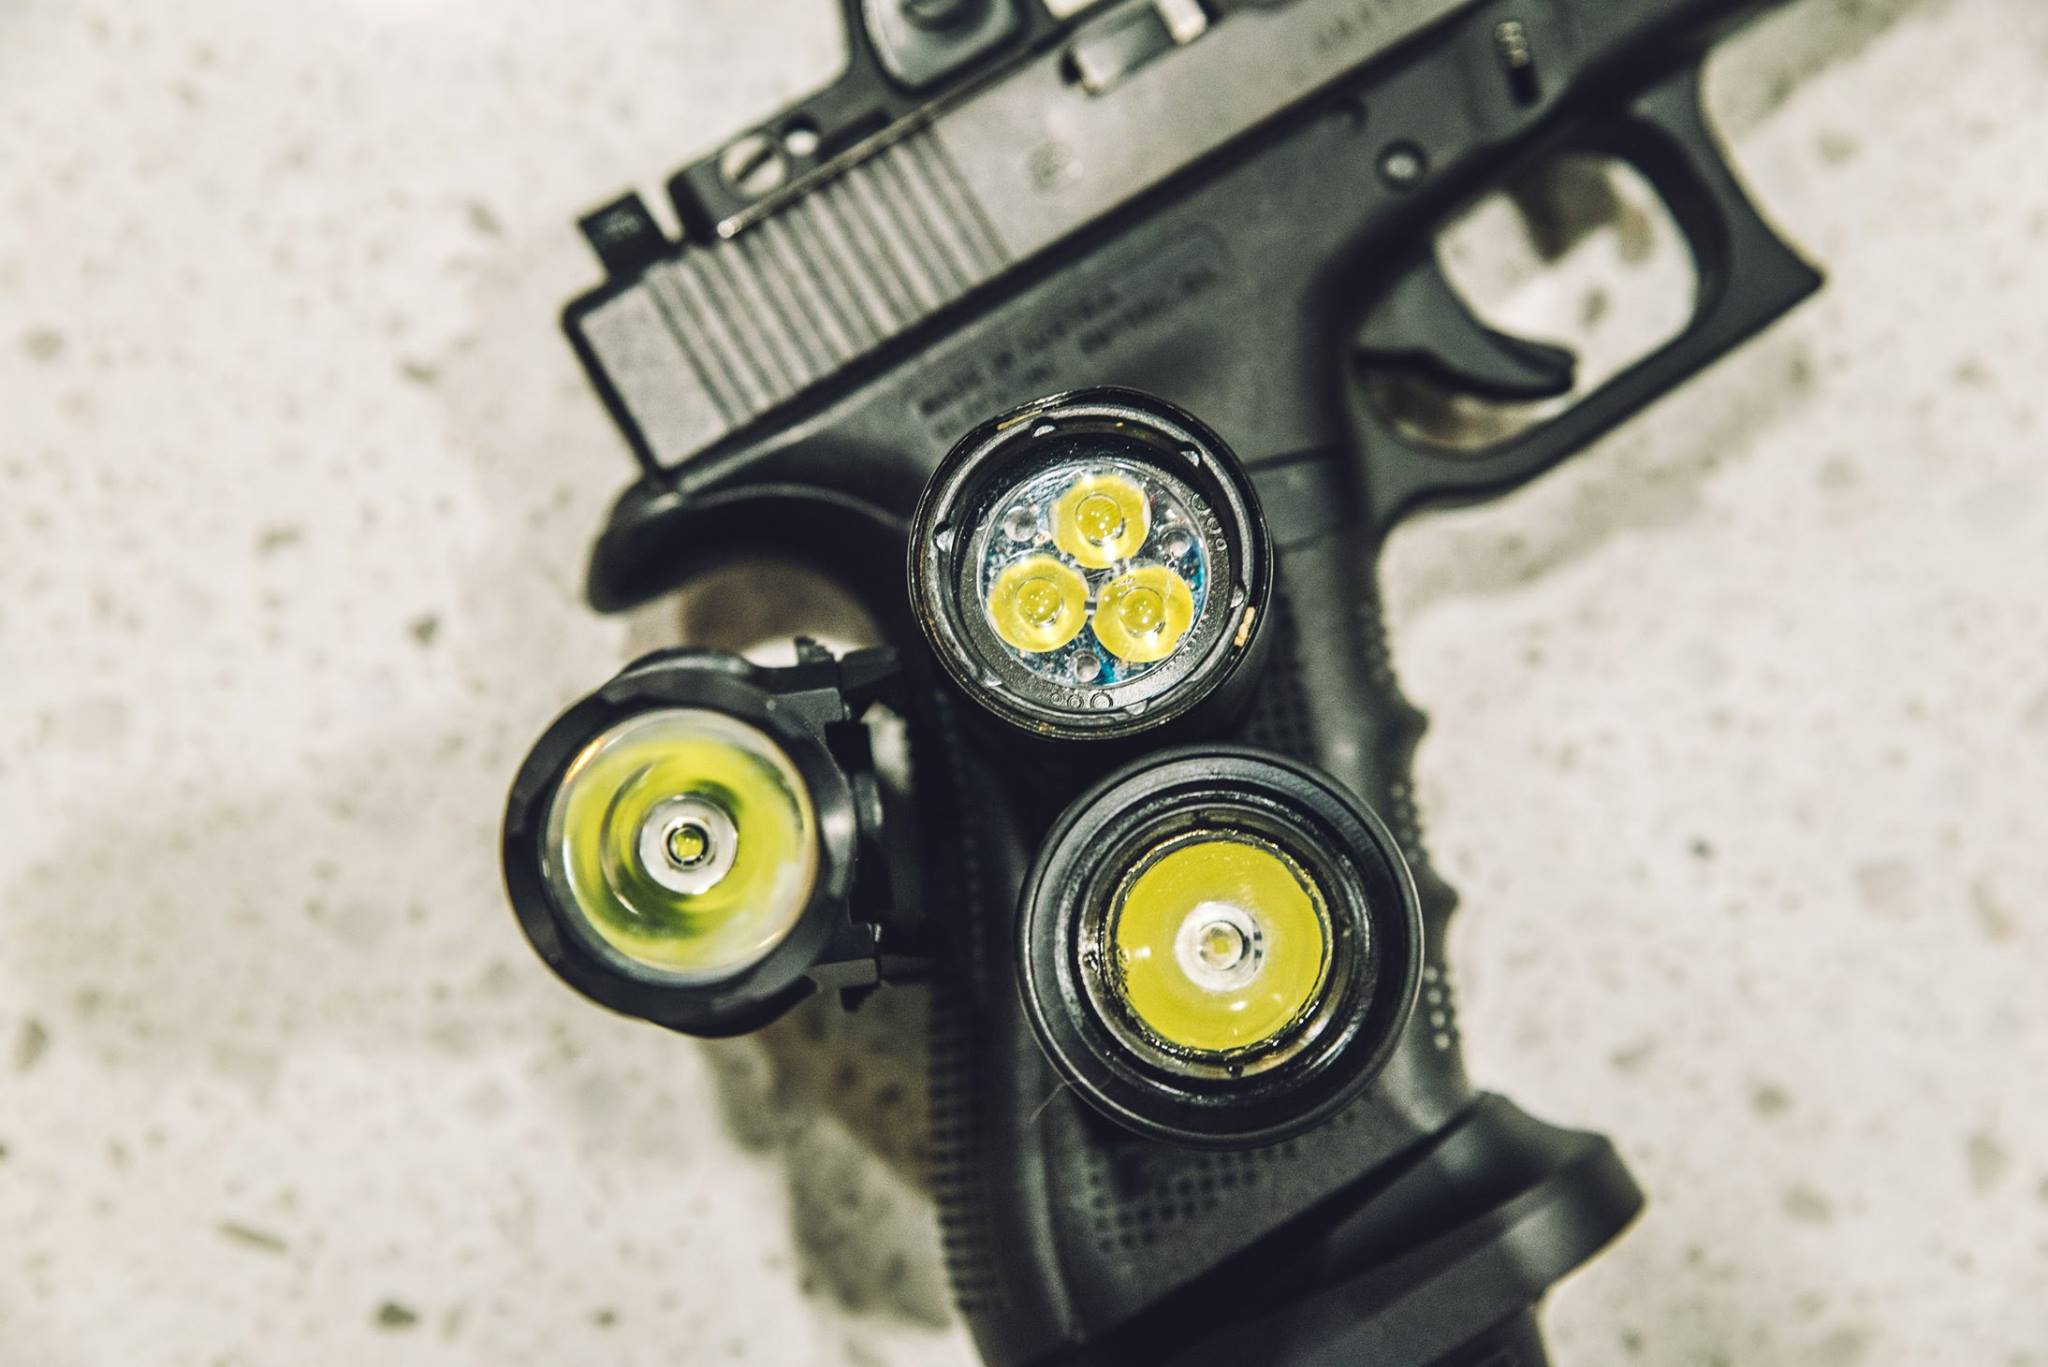
I rented a Nikon DSLR with its IR filter removed from in front of its filter, which allows it to capture a much wider frequency band of light. In this case, I put a visible-light-blocking filter on the front of the lens so I was only capturing light above 720nm. This allowed the infrared pointer and illuminator from the MAWL-C1+ to appear brightly and allowed for a direct comparison of the three different range modes. Thought it might be interesting to visualize for people that have just seen the charts B.E. Meyers puts out but not seen them in person through anything other than narrow NVG tubes. Target was about 40yd from the rifle on the tripod and camera lens was 17mm equiv.

I find myself leaving the unit in the mid range setting 80% of the time for the wide splash around the area along with the nice bright spotlight around the target. This is mostly because the shooting I do is at gun ranges or outdoors at friends properties. When indoors the short range setting is fantastic for filling a room and lighting up everything within my NVG's view, without blooming super close targets. I still have yet to hit another shoothouse class and make use of the C1+ but would imagine I'd be flipping between short and mid quite a bit there. The long range setting does a great job when used in conjunction with a clip-on unit like the PVS-30 and its very clean beam pattern really seems to stretch further than restricted units that have noisy, blotchy laser projections. While I didn't understand the long range lockout function on the range selector at first, it works great for me to be able to easily switch between my most used settings very quickly without having to find the middle position. Long range becomes relegated to when I put it on a DM or bolt gun and don't want the mid range flood to splash off grass and other obstructions.

Pistol sights under various lighting conditions

Recently a discussion came up in the Primary & Secondary Discord chat server regarding recommended pistol sights for defensive use. The two non-red dot suggestions that seemed the most popular were Tritium-based "night sights" (either front-only or all around) and a fiber-optic front sight with blacked-out rear.

Having a handful of different sight setups on a few of my Glocks, I figured it'd be handy to compare them side-by-side in various lighting conditions in a consistent manner. While I had my own feelings going into it, I found it interesting how similar the tritium and fiber options were with blacked out rears. Granted that was just when the tritium front sight came with a day-glo orange ring around it for extra highlighting, but I had expected the narrow fiber sight to have a clear advantage in all situations other than completely dark (which may be difficult to come up with a justifiable circumstance for).

Read More

Night Shoot at Iron City Gun Club

A buddy and I visited the Iron City Gun Club in the evening this last weekend and stuck around after dark. We wanted to try using a Knight's Armament AN/PVS-30 clipped onto a 6.5 Creedmoor bold-action and a MK-12 Mod 1 5.56mm AR-15. We also used helmet-mounted Mod-3 night vision goggle tubes (from Nightlong Industries) firing an HK MR-556 SBR with an aiming laser.

Here's a couple clips, shot through one of the Mod-3 tubes and an ATN Thor thermal optic:

Oveready Triple Surefire Scout Head

I posted this brief overview over on the Primary & Secondary fb page, but figured it'd be good to share here as well - 


I’ve had the Oveready aftermarket Triple Surefire Scout head since last summer and finally got around to taking a few comparison photos. It’s marketed as 3500 lumens and goes for just under $300 (currently out of stock). It’s almost identical in weight and size to the stock heads, and has a clean black finish without any extra logos beyond the heat warning.

I’ve found the beam to be extremely wide, offering a solid, even flood that’s perfect inside structures. This is not like a 1000 lumen spotlight with a super hot focused spot for tagging things a long ways out - it’s like turning the lights on when inside. The diffuse nature of the beam means it’s similar to a much lower-power light at distance but extremely impressive up close. I’ve seen no concerns with shadows around objects or being thrown by other jewelry hanging off the front of a rifle.

You’ll see it compared below to another Scout head (the KM2, which offers 150 lumens visible and 120 mW of IR), and the X300 Ultra-A (500 lumens) using identical manual camera settings. The differences in hot spot diameters is immediately visible, and you can start to see the extra splash bouncing around the room from the light brown blinds.

The Oveready head also has fully customizable features, so you can reprogram it to perform different based on number of activations. This reprograming occurs using Oveready’s online app, where you make selections for brightness levels, strobe patterns, etc, and then create a programing video clip. They have you click your way into program mode on the flashlight, then hold it up to your computer monitor, where it “sees” the programing video and saves it to its internal memory. I thought they were crazy at first, but it definitely works - I have this one set up to be full-blast for the first 3 quick activations, followed by a 20% level on the 4th click in case I just wanted a task light. It allows you to set your secondary mode behind a number of quick taps to make sure you don’t accidentally engage it.

It uses a pair of IMR 16340 cell batteries to keep up with the power demands, which is rechargeable and puts out a peak 4.2 volts in the same body as a CR123. When operating at full brightness (30 watts, 3500 lumens), they advertise 9 minutes of straight run time. If you left it on that long I’m sure you’d need to be careful of the heat that’s being put out. If you run at around 1/3 power or 1300 lumens, they say it’ll last 24 minutes on a full charge. Here’s the manufacturer’s page on the head.